It is possible to develop applications that query commercial LLM (Large Language Model) systems using HTTP/REST APIs or Python or TypeScript libraries to add original, useful, and advanced features to your products.
However, using these commercial systems involves some issues that can be significant limitations and need to be addressed, for example:
- The cost of queries or subscriptions to services like ChatGPT from OpenAI or Claude from Anthropic,
- Privacy concerns, meaning the leakage of strategic or sensitive data outside an organization to foreign multinational companies.
- The inability to use these systems in offline mode.
- The risk of lock-in, i.e., becoming dependent on a third-party company and its commercial decisions.
For this reason, it is useful to run an LLM model on the organization’s servers or on a private cloud. Indeed, several technologies are already available that allow the use of open-source models in private and secure environments. Only this way can you have full control over your system.
There is also a simple and free way to test and experiment on your own PC, which is LM Studio, a free, cross-platform desktop application that allows downloading, running, and querying LLMs.
Installation and Configuration
LM Studio is available for Linux, Apple, and Windows systems. On Windows, just download the installation package from the official website [1] and run it.
Once installed, the interface presented to the user looks like this:

First, you need to choose and download a model by clicking the magnifying glass (Discover) on the left sidebar:
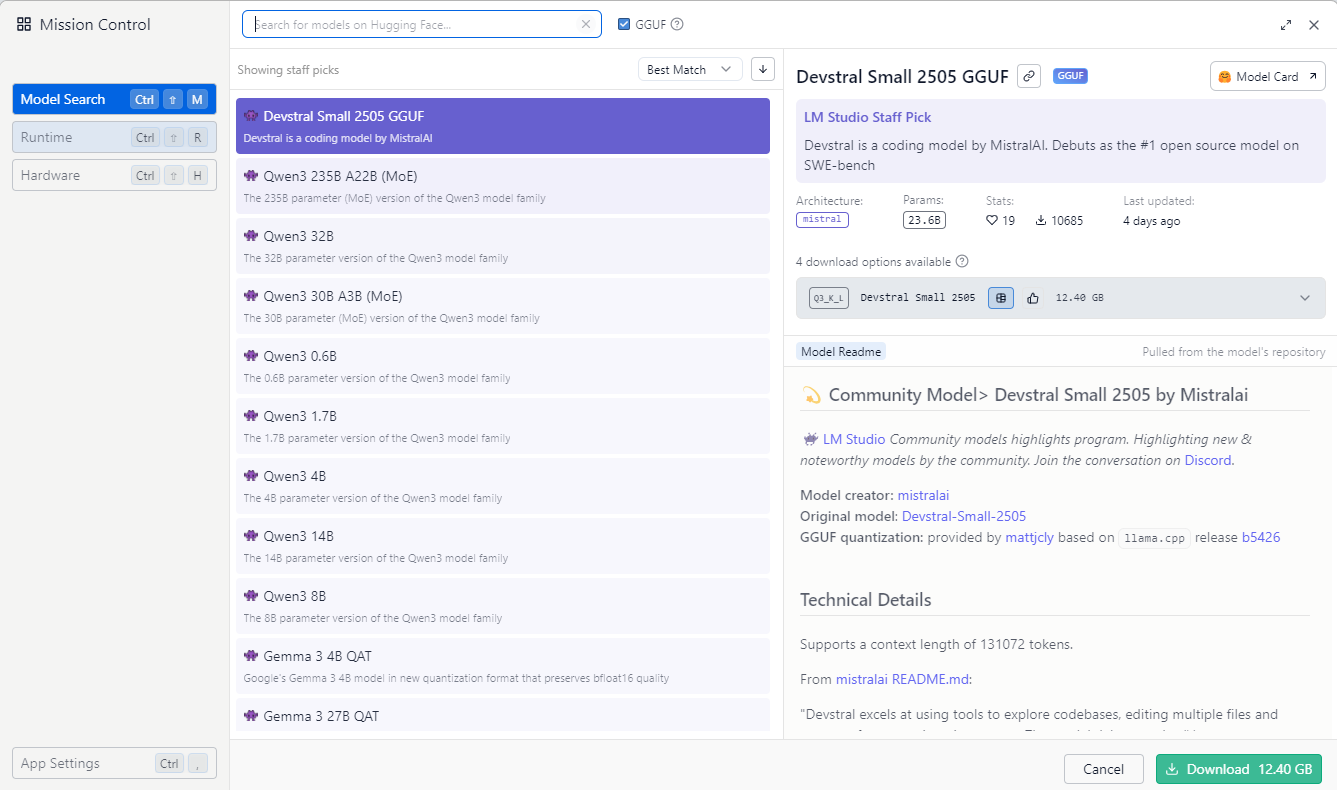
For each model listed, various information is provided: name, architecture type, number of parameters, number of downloads, technical details, creation date, and most importantly, whether your computer’s resources are sufficient to run that model.
For example, you might try searching for and downloading the DeepSeek model or the Phi 3 mini model from Microsoft.
After downloading it locally, the model must be loaded by selecting it from the menu at the top of the main program window.
Once loaded, you can query it using the application interface just like you would with online commercial services. You can even enrich your request with attachments.
What Is a Model?
A model is a Transformer-type neural network already trained and distributed in an optimized format to be run locally even on consumer hardware.
Basically, these are binary files that can have various formats (in the case of LM Studio, the format is GGUF [4]) and contain: weight matrices, encoded network structure, learned states during training, etc.
The model name includes codes indicating the number of parameters used, which relate to the network’s complexity and file size:
| Abbreviation / Suffix | # Parameters | Approximate GGUF File Size * | Example |
| 350M | 350 million | ~300 MB / ~400 MB | Minerva-350M-base-v1.0-Q8_0-GGU |
| 1.3B | 1.3 billion | ~1 GB / ~2 GB | deepseek-coder-1.3b-instruct-GGUF |
| 3.1B | 3.1 billion | ~1.2 GB / ~7 GB | Phi 3.1 Mini 128k |
| 7B | 7 billion | ~3 GB / ~13 GB | DeepSeek R1 Distill Qwen 7B |
| 65B | 65 billion | ~30 GB / ~130 GB | LLaMA-65B-GGUF |
* File size varies depending on quantization, for example: Q4_0, Q4_K_M, Q6_K, Q8_0, FP16, Q5, Q5_K_M are possible levels.
Quantization in deep learning models is a compression technique used to reduce the model’s size and computational requirements, making it faster and more efficient, especially on devices with limited resources (such as smartphones, laptops, or microcontrollers). The Q4_K_M and Q6_K formats currently represent the best compromise between file size and performance quality.
Operating Modes and Interaction Methods
From the interface, three operating modes can be activated: User, Power User, and Developer. Each allows enabling configurations of varying complexity based on your skills. The third mode allows starting an accessible server whose purpose is to enable external applications to interact with the model via HTTP APIs or through a library.
In summary, you can interact with a model running in LM Studio in three different ways:
- Through the user interface: classic interaction.
- Through an HTTP API: very useful for web applications.
- Through a Python or TypeScript library: useful for creating modules, agents, or various applications.
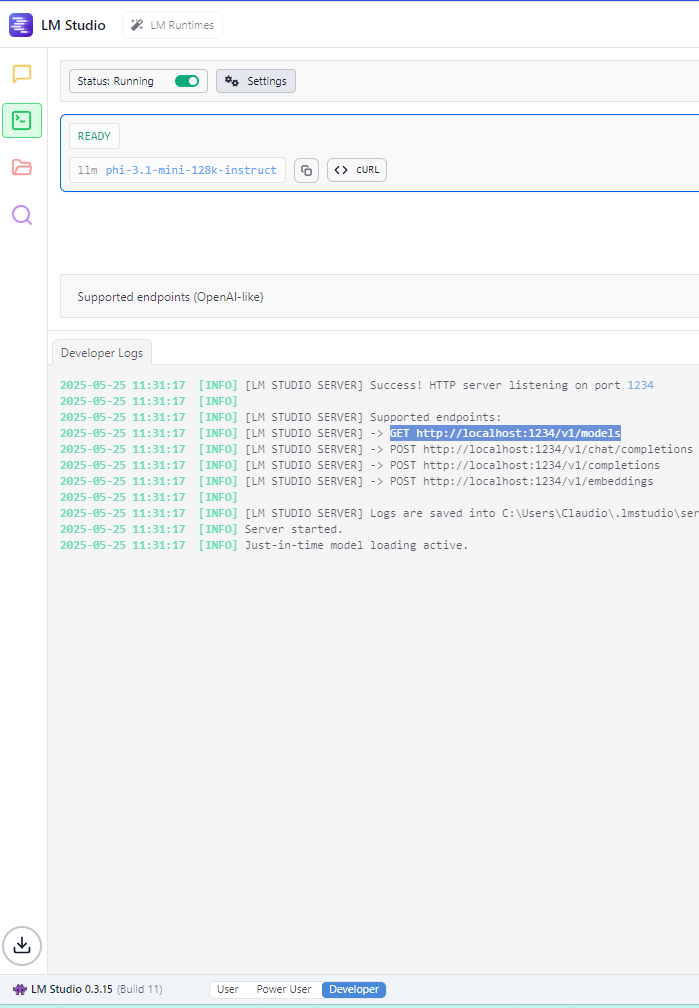
To start the LM Studio server, after selecting the Developer mode at the bottom of the main window, just click the green “prompt” icon (Developer) in the left bar and then start it with the button in the Status section:
Interaction via HTTP API
After starting the LM Studio server, which by default listens on port 1234, you can make HTTP calls using a browser, the curl command, a program like Insomnia, or your preferred programming language.
For example, with a browser, you can use this URL to see the list of downloaded models: http://localhost:1234/v1/models.
Or with the CURL command, you can query the model like this:
curl http://localhost:1234/v1/chat/completions -H "Content-Type: application/json" -d "{\"model\": \"phi-3.1-mini-128k-instruct\", \"messages\": [{\"role\": \"user\", \"content\": \"What is a capybara?\"}], \"temperature\": 0.7}"
Interaction with Python via the lmstudio Library
To query the model using Python, you need to install the lmstudio library:
pip install lmstudio
Then run the following code:
import lmstudio as lm
model = lm.llm("deepseek-r1-distill-qwen-7b")
prediction = model.respond("Explain special relativity in simple terms.")
print(prediction)
Or the following:
import lmstudio as lm
model = lm.llm("deepseek-r1-distill-qwen-7b")
prediction = model.respond_stream("What is a Capybara?")
for fragment in prediction:
print(fragment.content, end="", flush=True)
print()
With TypeScript, the syntax changes, but the interaction method is similar.
Interaction via the Console
You can also interact with the server via command line, using a console integrated in LM Studio, with the lms command.
Some example commands:
lms version
lms ls
lms load phi-3.1-mini-128k-instruct
lms ps
lm server start
lm server stop
...
Image Gallery
Below are some screenshots of the configurations and tests described in this post:


Sources and References
- LM Studio AI: official website.
- Official documentation of LM Studio.
- How to Use Generative AI Locally on PC: LM Studio, Ollama, and Open Source Models, Lore Cloud on YouTube.
- GGUF Format on the Hugging Face website.
- Querying Bard / PaLM from Google with Python, on this blog.
- Querying OpenAI’s ChatGPT with Python, on this blog.
*** Note: This article was translated using an automated workflow built with n8n and OpenAI.