In recent years, many “no-code” or “low-code” workflow automation platforms have emerged, allowing the connection of applications (web and desktop), APIs, and services without writing complex code. n8n is one such platform, open source, free, easy to use, and highly flexible. With just a few clicks, you can create workflows that exchange data between applications, APIs, or databases, automating repetitive tasks like sending emails, updating spreadsheets, or integrating enterprise systems.
In the coming weeks, I will use it to test the automation of some processes and to check if some workflows, currently running on a Mulesoft ESB, can be migrated to this platform.
For this reason, I had to install it both locally on my Windows PC (using the existing Node.js interpreter) and on an Ubuntu server (using a Docker container). In this post, I describe the steps to complete these installations.

Summary
1. Workflow Automation: Differences with NodeRed and Mulesoft ESB
Regarding process automation, I have worked with several products, including n8n, Node-RED, and MuleSoft ESB. While they have some similar functionalities, they are tools with very different philosophies.
- n8n is designed to be lightweight and flexible, allowing the creation of automation workflows by connecting APIs, services, and scripts without writing much code. It is perfect for tests, quick integrations, or personal automations with programs like Gmail, social apps (Facebook, X, etc.), Gdrive, communication platforms (Slack, Discord), messaging apps (WhatsApp, Telegram, etc.), AI APIs, etc.
- Node-RED is a product used in the IoT field, as a graphical interface to design flows that process events and data in real-time. It is ideal for sensors, Raspberry Pi, or systems that react to continuous external inputs.
- MuleSoft ESB is a commercial product (though it has a CE version) that functions as an Enterprise Service Bus, a platform for orchestrating complex integrations between enterprise systems, managing APIs, security, logging, etc., centrally. Mule ESB is excellent for enabling communication between applications written in different languages or using data in different formats, gradually modernizing obsolete systems, and preventing applications from communicating with each other through point-to-point connections but rather through a centralized “bus.”
All three products offer a dashboard where you can connect using drag and drop of “blocks,” each performing a certain activity or processing data passed to the next block. All three can retrieve these blocks from a library containing many ready-made and configurable ones.
The choice of one of these three products depends on the complexity, scope, and purpose of the project.
2. Local Installation and Configuration with Node.js and PM2
Below are the steps I followed to install n8n on Windows 11,
It is necessary to have Node.js on our PC, which contains the npm package manager. If it is already present, the first step in the following list can be skipped:
- Installation of Node.js: For Windows, there is an installation package to download and run.[5]
- Installation of n8n and pm2 (a process manager useful for starting programs that use Node.js). From the terminal (e.g., PowerShell), type the command:
npm install -g n8n pm2
- Still from the terminal, we can start n8n with the following command:
n8n
- If the program has started, it will also be possible to open it in the browser by typing the letter “o” on the keyboard, as the following message says:
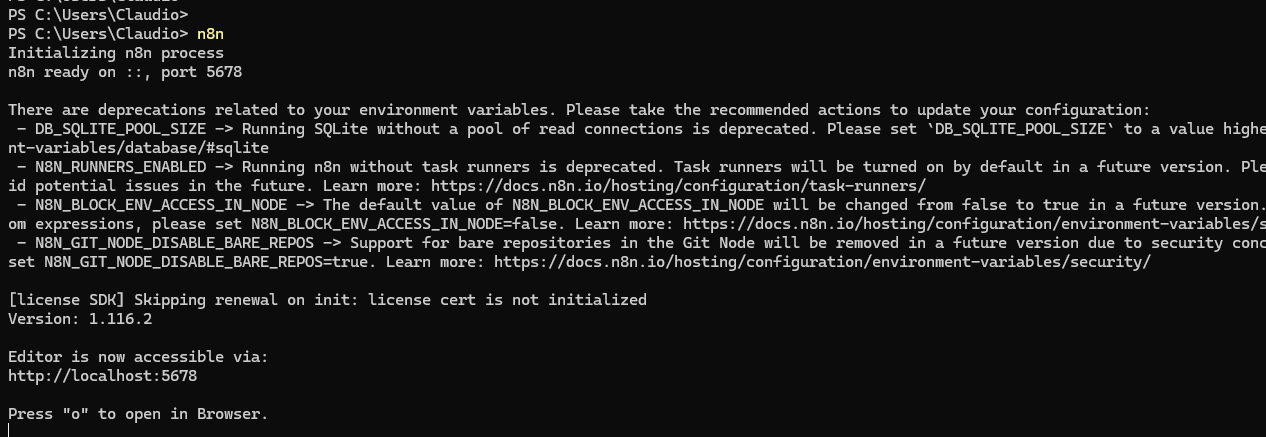
- At this point, the program is running on port 5678 (http://localhost:5678) and a form appears to set up the administrator account.
- Press CTRL+C to stop the execution.
- Let’s see in which directory n8n was installed (we will need it to configure pm2):
PS C:\SPAZIODATI> where.exe n8n C:\Users\claudio\AppData\Roaming\npm\n8n C:\Users\claudio\AppData\Roaming\npm\n8n.cmd
- At this point, we can introduce pm2, a program that facilitates the startup and monitoring of Node.js applications. So, in a working directory, create the file ecosystem.config.json and write the command to start n8n:
{ "apps": [ { "name": "n8n", "script": "C:\\Users\\claudio\\AppData\\Roaming\\npm\\node_modules\\n8n\\bin\\n8n", "env": { "N8N_PORT": 5678, "N8N_EDITOR_BASE_URL": "http://localhost:5678" } } ]} - After saving and closing the file, we can run one of the following commands to start n8n:
pm2 start C:\SPAZIODATI\ecosystem.config.js #From any folder. pm2 start ecosystem.config.js #From the folder where the file is located.

- This is a list of commands to manage processes:
pm2 list #Shows the list of processes managed by PM2 with status, uptime, and CPU/RAM. pm2 stop n8n #Stops n8n pm2 restart n8n #Restarts n8n pm2 delete n8n # Removes n8n pm2 logs n8n # Shows real-time logs pm2 show n8n #Complete details on the “n8n” process (path, log, environment variables, etc. pm2 monit #Opens an interactive interface to monitor resources and logs. pm2 reload all #Reloads all processes without downtime (useful in production). pm2 env 0 #Shows the environment variables of the process with ID 0. pm2 update #Updates PM2 and reloads all processes. pm2 save #Saves the current state of processes for automatic restart at boot. pm2 startup #Configures PM2 to start automatically at system reboot. It will show you a command to copy and paste.
Note that if we needed other Node.js-based applications, we could insert the startup commands in ecosystem.config.json and manage all these applications with pm2 commands, using the name we gave them in the JSON file in the “name” attribute. It is also possible to make the applications start at the operating system boot.
2. Installation on Ubuntu Server with Docker Compose
I also installed n8n on my server to have a version accessible from the Internet. As everyone knows, I have a virtual server with Ubuntu on Aruba where I conduct various tests.
On this server, I installed Docker to run containers. Below are the commands I used, keeping in mind that:
- I chose to use a persistent volume (disk) as a folder accessible without entering the container (Bind Mounts): /home/n8n/data.
- For simplicity, Docker on the server runs as root. This is not a production installation, and the containers are only on while I use them.
Procedure:
- I created the folder /home/n8n/data and gave write permissions to user 1000, which on the container is the user running n8n, while on my server, it is the Ubuntu user:
sudo mkdir /home/n8n sudo mkdir /home/data sudo chown -R 1000:1000 /home/n8n cd /home/n8n sudo vi docker-compose.yml
- In /home/data, I created the file docker-compose.yml with this content:
services: n8n: image: n8nio/n8n:latest container_name: n8n ports: - "127.0.0.1:5678:5678" # exposed only in localhost, passes through Apache environment: - N8N_HOST=n8n.claudiobattaglino.it - N8N_PROTOCOL=https - WEBHOOK_URL=https://n8n.claudiobattaglino.it - N8N_EDITOR_BASE_URL=https://n8n.claudiobattaglino.it - N8N_PORT=5678 - N8N_USER_MANAGEMENT_DISABLED=false - N8N_SECURE_COOKIE=true - N8N_ENCRYPTION_KEY=${N8N_ENCRYPTION_KEY} - N8N_PROXY_HOPS=1 volumes: - /home/n8n/data:/home/node/.n8n # SQLite, config, keys volumes: {} - After saving and closing the file, I executed this command to create an encryption key:
root@quercia:/home/n8n# openssl rand -base64 32
- The output of this command should be saved and copied into the file /home/n8n/.env so that it has content like this:
root@quercia:/home/n8n# cat .env N8N_ENCRYPTION_KEY=eGKkIs......Myd7cOmQ=
- At this point, you can create the container that will listen on port 5678 (http://127.0.0.1:5678).
docker compose up -d
- Now the container is running.
- These are some commands that can be used in its management:
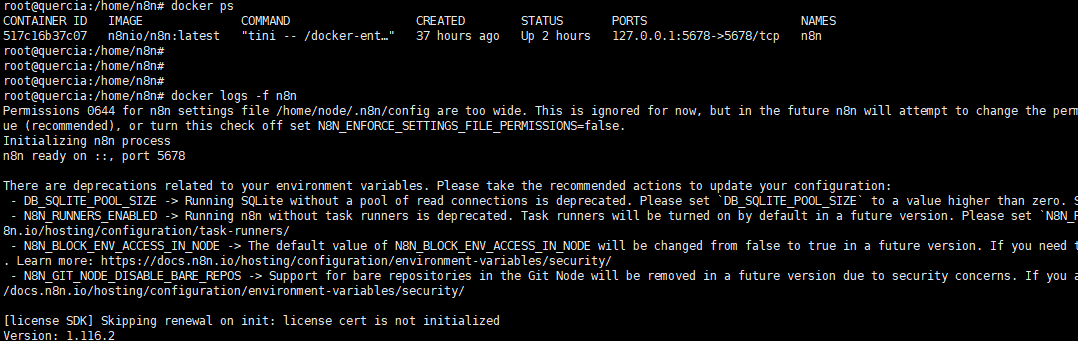
docker ps # Shows active containers. docker ps -a # Shows all containers, even stopped ones. docker start n8n # Starts the n8n container (if already created). docker stop n8n # Stops the container. docker restart n8n # Restarts the container. docker rm n8n # Deletes the container (must be stopped). docker logs -f n8n # Shows real-time logs of the container.
These are other useful commands for managing, maintaining, and debugging Docker containers:
ATT!!! The instructions I provided are for setting up an instance to try n8n, not for creating a production service.
3. Apache Configuration to Make n8n Accessible from the Internet
After installing n8n in a container on the Ubuntu server, the program is only accessible locally at the address: http://127.0.0.1:5678.
Apache 2 is installed on the server, and certificates are managed with Certbot from Let’s Encrypt.
To make it visible from the Internet, the following steps were necessary:
- DNS Modification: Adding an A record to point the address n8n.claudiobattaglino.it to this server’s IP address.
- Apache Modules: Installation of the following modules on the server:
sudo a2enmod proxy proxy_http proxy_wstunnel headers rewrite sudo apachectl configtest sudo systemctl reload apache2
- SSL Certificate Installation:
sudo certbot --apache
- Virtual Host Configuration: creation of the file 004-n8n.claudiobattaglino.it.conf and the file 004-n8n.claudiobattaglino.it-le-ssl.conf:
root@quercia:/etc/apache2/sites-available# cat 004-n8n.claudiobattaglino.it.conf <VirtualHost *:80> ServerName n8n.claudiobattaglino.it RewriteEngine On RewriteRule ^ https://%{SERVER_NAME}%{REQUEST_URI} [END,NE,R=permanent] ErrorLog ${APACHE_LOG_DIR}/n8n_error.log CustomLog ${APACHE_LOG_DIR}/n8n_access.log combined </VirtualHost>root@quercia:/etc/apache2/sites-available# cat 004-n8n.claudiobattaglino.it-le-ssl.conf <IfModule mod_ssl.c> <VirtualHost *:443> ServerName n8n.claudiobattaglino.it ProxyPreserveHost On ProxyRequests Off ProxyAddHeaders On RequestHeader set X-Forwarded-Proto "https" # --- WebSocket for n8n Push channel --- ProxyPass /rest/push ws://127.0.0.1:5678/rest/push ProxyPassReverse /rest/push ws://127.0.0.1:5678/rest/push # --- Normal HTTP traffic --- ProxyPass / http://127.0.0.1:5678/ connectiontimeout=5 timeout=600 ProxyPassReverse / http://127.0.0.1:5678/ ErrorLog ${APACHE_LOG_DIR}/n8n_error.log CustomLog ${APACHE_LOG_DIR}/n8n_access.log combined SSLCertificateFile /etc/letsencrypt/live/n8n.claudiobattaglino.it/fullchain.pem SSLCertificateKeyFile /etc/letsencrypt/live/n8n.claudiobattaglino.it/privkey.pem Include /etc/letsencrypt/options-ssl-apache.conf </VirtualHost> </IfModule> - Apache Restart: check that the configuration is correct and restart Apache:
sudo apachectl configtest sudo systemctl reload apache2
- The site is now accessible at the address: https://n8n.claudiobattaglino.it.
Some screenshots of the application:


Sources and References
- n8n, official site.
- Community n8n: Connect, Learn, and Share Automation Insights, official site.
- n8n Tutorial Playlist, official YouTube channel.
- Installing Node-RED for IoT Flow Design, on this blog.
- Node.js, official site.
- PM2, official site.
- PM2 Process Management Quick Start, official site.
- What is Mule ESB?, official site.
- Node Red, official site.
- Introduction – Node-RED Essentials, YouTube.
- Node-RED Basic Course in Italian – Introduction – 1, RobotProjects, YouTube.
*** Note: This article was translated using an automated workflow created with n8n and OpenAI.